Challenge
Pinpoint Laser System’s engineering team received an inquiry from a large naval shipbuilder looking for a way to verify the edge straightness of large steel hull panels prior to assembly on a Naval Destroyer. To achieve this, they knew they needed a customized solution for this project.
Large steel hull plates with a thickness of over three inches, measuring 27 feet in length and approximately 10 feet in width, are welded together forming the hull of the destroyer.
Each plate must have straight edges so that when multiple plates are joined together the resulting gap or seam is very small, which ensures structural strength and durability. The edge of each plate is also chamfered with a bevel so when 2 plates are joined there is a groove for welding and added strength.
The shop floor needed a measurement system that could quickly check large steel plates, while the steel hull plate is in the machine shop prior to assembly out in the yard.
The measuring system needed to support a rapid QC checking process and ideally require a minimal number of operators. It also needed to be durable and reliable given the large industrial workspace and varying temperature and operating conditions in the shop and yard.
Solution
Working closely with the customer, Pinpoint Laser System’s engineering team selected the Microgage 2D system for this demanding application.
Here’s a breakdown of what was needed:
- The ability to take measurements in two axes, X and Y.
- The system needed to be portable to move around the shop and yard.
- A battery powered system was recommended given the extensive shop floor versatility and movement.
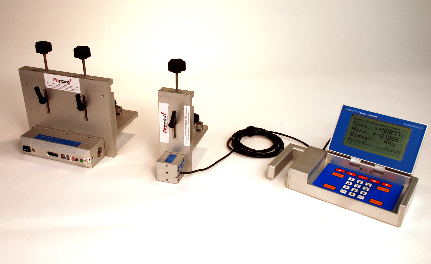
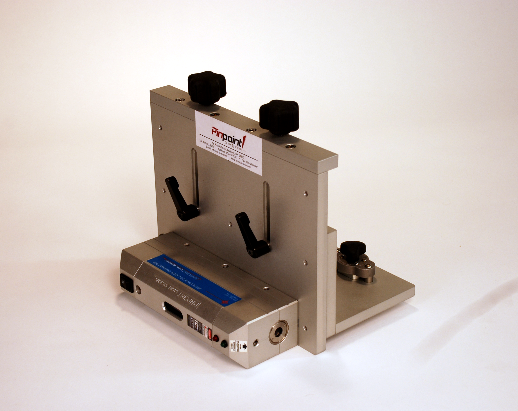
In addition to the standard laser transmitter and dual axis receiver, Pinpoint Laser Systems designed and fabricated two magnetic mounting systems that would support the laser and receiver on the edge of each plate being measured.
The mounting plate for the laser transmitter contacted the edge of the plate and has two adjustment screws so that the laser transmitter could be positioned an appropriate distance edge of the hull plate. Magnetic on/off locks secured the laser transmitter in place for the measurement and could be quickly used to secure or remove the laser transmitter between measurements.
The Microgage Dual Axis Receiver has a similar mounting arrangement allowing the receiver to be moved manually down the edge of the hull plate while taking a series of measurements. The operator could watch the portable Microgage 2D Display and if the steel plate edge measurement values exceeded a preset range the plate could be rejected.
Once the edge of the plate was checked, and verified, the laser transmitter and receiver could be quickly removed and attached to the opposite edge of the hull plate or moved to other plates in the queue for measurement.
The Laser Microgage, and the adjustable magnetic fixturing, allowed for precise measurements to be made quickly on each steel hull plate and provided flexibility move to different sized plates and adjust for varying plate thickness.


