Microgage PRO

Microgage PRO Plus

Precision Laser Alignment Tools

Microgage 2D

The Pinpoint Spindle Kit can be adapted to a wide variety of industrial measuring and alignment requirements. Each receiver measures in two axial directions (X & Y) and can be used for checking straightness, flatness, parallelism, squareness, bores, spindles, and other alignment needs. Measurements as small as 0.0001 inch are shown on a large, easy to use, display and the laser and receiver can be separated by a few inches up to 150 feet for large industrial projects.
Pinpoint Spindle Kit Overview
How It Works
The Pinpoint Spindle laser alignment Kit has three main components, a laser transmitter, a digital receiver, and a display. A highly collimated, low power laser beam is projected from the end of the laser housing and is aligned parallel to its mounting shank. The electronic receiver detects the laser beam and provides a digital readout showing the height and lateral position of the laser beam.
Pinpoint Spindle Kit Configuration
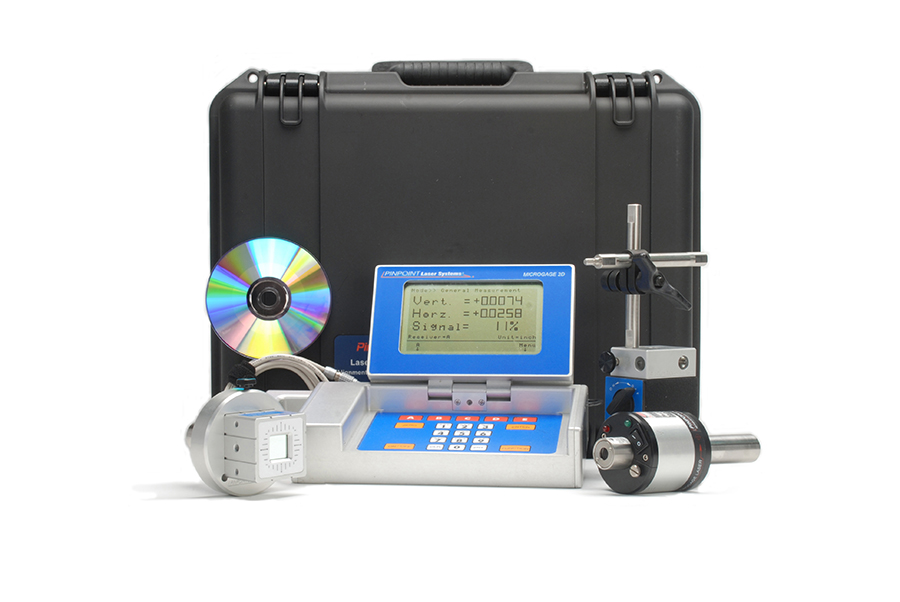
The Spindle Alignment kit combines the Microgage 2D with accessories for aligning spindles, CNC turning centers and bore alignment.
- Microgage Self Contained Cylindrical Laser
- Microgage 2D Receiver
- Spindle Alignment Receiver Mount
- Microgage 2D Display
- Computer Interface and Software
- On/Off Magnetic Mount
Capabilities
- Straightness & Linear Measurements
- Flatness & Planer Measurements
- Squareness & Perpendicular Measurements
- Run Out Measurements
- Lathe & Spindle Alignment
- Bore Alignment
Typical Applications Include
- Measuring stage and table runout
- Checking machine tool squareness
- Measuring straightness of machinery
- Assembling long machinery runs
- Measuring surface flatness
- Checking spindle and lathe alignment
- Measuring shaft and machinery deflections
- Aligning bores and pistons
- Aligning CNC milling and turning centers
Industries
Aerospace
- Aligning and checking launch tracks
- Aligning rocket sub-assemblies
- Aligning radar tracking systems
Aircraft
- Wing Flap Support Alignment
- Alignment of Tail Rotor Drive Shafts
- Engine Mount Alignment and Positioning
- Landing Gear Alignment
Electronics
- Aligning robotic test equipment
- Ion implanter assembly
- Checking runout on moving stages
- Installing & checking robotic transfer equipment
Machine Tool
- Measuring runout on X, Y and Z axes
- Aligning lathes and machining spindles
- Installing new machinery and sub-assemblies
Manufacturing
- Machine installations
- Adjusting presses, shears, and indexers
- Measuring travel errors on gantry equipment
- Bore alignment
- Aligning gearbox & bearing assemblies
- Press to Platen Alignment
Medical
- Aligning patient tables
- Positioning scanner assemblies & rings
- Measuring flatness & planer detector assemblies
Rubber & Plastics
- Extruder bore alignment
- Roll and web alignment
- Platen-to-platen parallelism
Pulp & Paper
- Roll and web alignment
- Fourdrinier and wire/felt roll alignment
- Press roll alignment
- Calender and king roll alignment
Shipbuilding
- Aligning engine mounts & reduction gearboxes
- Locating & alignment of Z drive tug propulsion systems
- Adjusting stern tubes, struts & cutlass bearings
Talk to our alignment specialists
[formidable id=16]
Talk to our alignment specialists
[formidable id=16]
Pinpoint Laser Systems Manufacturing Customers Include:


