 Many machine tools rely on the squareness or perpendicularity between moving tables or slides and also the axis of travel for a cutting bit. Traditional methods for checking the squareness of machine tools rely on granite squares or jigs and fixtures coupled with precise dial indicators. The lengthy time and effort needed to perform these alignment checks has been a deterrent to their use. The development of the laser alignment system has made the task of checking squareness much easier, faster, and considerably more precise.
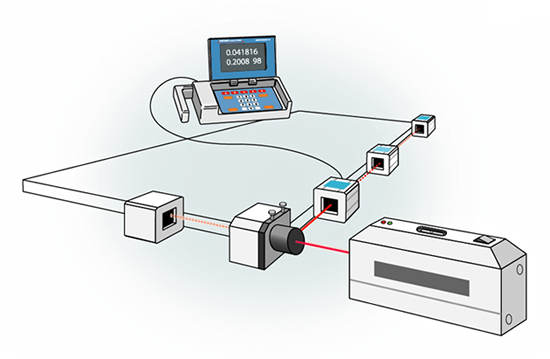
Here is how it works. A laser reference beam is projected down the length of one axis on a machine tool. A digital receiver measures the height of the laser beam to the machine table and the readings are used to guide the position of the laser beam until the readings on the table are equal to each other. The laser reference beam is now parallel to the slide table. At this point, a right angle optic is placed in to the laser beam.
CNC Machine Alignment
Pinpoint makes several of these devices and they are called the 90-Line Right Angle. The laser reference beam enters the 90-Line and passes through an optical component called a penta-prism which steers the laser beam until it exits the 90-Line at a very precise 90 degree, right angle. The optical design of the penta-prism, and Pinpoint’s alignment optics, ensure that the exiting and entering laser beams are precisely square to each other, regardless of the position and orientation of the 90-Line enclosure. Furthermore, the nosepiece of the 90-Line can be rotated through a full circle and the square exiting beam forms a square plane of light, relative to the incoming laser reference beam.
Placing the laser on the machine table or slide, in the path of the laser beam, creates a new right angle reference line that can be used to check the orientation and travel of other square machine axes. Moving the laser receiver along the square axis and taking readings will tell you if the two machine axes are square to one another and if they are not square, what corrections are needed. The 90-Line can check machine tools axes that lie in the same horizontal plane or check vertical planes as well. In addition to the great precision of the laser system, squareness measurements can be made over distances of 100 feet or more for checking large machines.
Laser alignment systems and optical accessories are expanding the measuring capabilities of manufacturing companies and allowing companies to align and repair their own production equipment.


